"Find something you are passionate about and keep tremendously interested in it." -Julia Child
Since I last posted, there have been many changes in my life. I'll go ahead and cover all my bases since I get the same questions on a daily basis.
1. Yes, I am now living in Huntsville, AL.
2. No, I have not graduated.
3. Yes, I plan to.
4. No, I am not in school now.
5. No, I am no longer planning on attending culinary school.
6. Yes, I am the new co-owner, soon to be owner, of Lyn's Gracious Goodness- a restaurant owned by my mother, Lyn Newcomb Aust, in Huntsville, AL.
Now a bit of explanation- First and foremost, I am happier now, running the restaurant, than I have ever been. In the last few months of work, some of you have made it evident that you disapprove of my decision to leave school, and I sincerely apologize if I have let you down. What I hope everyone can come to realize is that by not making this career move, I would have been letting myself down.
As far as cooking school goes, I did as much reading and personal research about it as possible-2 main issues came up for me. First, I read over and over that after spending two years and $200,000 you had maybe a 30% chance of getting anything above a prep job in a semi-prestigious restaurant. Also, I had to really question how much I wanted to be a chef- this was a big commitment! Did I want to play the behind the scenes role, or did I want to be the boss, the designer, the entertainer? It should come with little surprise to those of you who know me that chose the latter.
Realizing that culinary school probably wasn't my best option was very daunting to me- A sort of "well damn.... What do I do now?" sort of moment, but as she always does, Mama came through once again. As I was filling out my application to the two-year program at CIA, the Culinary Institute of America, Mama called to say that she just couldn't wait two more years and that she would be closing the restaurant. I just couldn't let her.
So here I am- and just like it did for her years ago, Lyn's has brought me back to life.
I had seriously considered ending this blog, but when people I didn't even know contacted me requesting more posts, I decided there must be some interest. I cannot promise you a daily post, but will make sure to blog at least once a week. I will promise you that this will not turn into a promotional blog for my restaurant, but since this blog is based on my life, the restaurant will be a part of some of my posts.
Stay tuned for a post on my favorite foods from my current vacation in Jamaica!

Sunday, September 4, 2011

Thursday, April 14, 2011
Millie's Iron Skillet Apple Pie
"Comfort me with apples..." - The Song of Solomon 2:5


Being from the South, we all know that there are few things in this world as welcoming and heartwarming as a homemade pie being pulled from the oven. When most of us imagine a 1950s American housewife, the picture that usually comes to mind is of a woman wearing a full-skirted dress, high heels and an apron, standing in her kitchen holding a pie. There's something uniquely American about pie, but in my opinion, Southerners do it best.
Over Christmas, I was asking family members for some of their favorite recipes that I could try out and then blog about. I hit the jackpot when I received this recipe for Iron Skillet Apple Pie from my cousin Nick's wife, Millie. Millie is one of the most kind, loving, and patient people you will ever meet. She is a fantastic mother, an extremely talented photographer, and a FABULOUS cook, who makes the most mouth-watering sweet treats you could ever imagine. This Iron Skillet Apple Pie recipe is pure gold. I advise that each of you print it out, make it for dessert tomorrow, and tuck it away in your recipe file for safe keeping.

Many great cooks will tell you that almost everything is better when made in a cast iron skillet. Not having much experience with one myself (other than making cornbread) I asked for one for Christmas. To my surprise, Mama gave me her very own Martin cast iron skillet, which apparently are very hard to come by these days. Now, I don't know about everything, but after trying this recipe of Millie's, I can boldly say that apple pie is most DEFINITELY better when made in a cast iron skillet. If you don't have one, head to your local hardware store and buy one. It will be a one-time purchase that you will use for the rest of your life.

This recipe is super easy, super inexpensive, and absolutely delectable. I've made it twice now and have eaten it not only for dessert, but also for breakfast the next morning...both times... whoops! It even had sweet little Napoleon licking his lips! This is a must-try recipe! Thank you Millie!

Click HERE for Millie's Iron Skillet Apple Pie Recipe!


Being from the South, we all know that there are few things in this world as welcoming and heartwarming as a homemade pie being pulled from the oven. When most of us imagine a 1950s American housewife, the picture that usually comes to mind is of a woman wearing a full-skirted dress, high heels and an apron, standing in her kitchen holding a pie. There's something uniquely American about pie, but in my opinion, Southerners do it best.
Over Christmas, I was asking family members for some of their favorite recipes that I could try out and then blog about. I hit the jackpot when I received this recipe for Iron Skillet Apple Pie from my cousin Nick's wife, Millie. Millie is one of the most kind, loving, and patient people you will ever meet. She is a fantastic mother, an extremely talented photographer, and a FABULOUS cook, who makes the most mouth-watering sweet treats you could ever imagine. This Iron Skillet Apple Pie recipe is pure gold. I advise that each of you print it out, make it for dessert tomorrow, and tuck it away in your recipe file for safe keeping.

Many great cooks will tell you that almost everything is better when made in a cast iron skillet. Not having much experience with one myself (other than making cornbread) I asked for one for Christmas. To my surprise, Mama gave me her very own Martin cast iron skillet, which apparently are very hard to come by these days. Now, I don't know about everything, but after trying this recipe of Millie's, I can boldly say that apple pie is most DEFINITELY better when made in a cast iron skillet. If you don't have one, head to your local hardware store and buy one. It will be a one-time purchase that you will use for the rest of your life.

This recipe is super easy, super inexpensive, and absolutely delectable. I've made it twice now and have eaten it not only for dessert, but also for breakfast the next morning...both times... whoops! It even had sweet little Napoleon licking his lips! This is a must-try recipe! Thank you Millie!

Click HERE for Millie's Iron Skillet Apple Pie Recipe!
Thursday, February 3, 2011
Let them eat cake!
"Everything in moderation...including moderation!" -Julia Child
So, we've already discussed how I have a little bit of an over-celebration problem and the birthday cake that I made for my friend Meagan's 24th birthday last weekend is a PERFECT example. Making cakes for my friends has become a tradition with me, but I will openly admit that I went a little bit overboard on this one. But hey, everyone loves a little extravagance on their birthday!

While making and eating this chocolate buttercream cake, we all need to completely erase the word "moderation" from our vocabularies. This recipe calls for so much butter that I'm shocked it isn't one of Paula Deen's recipes. But as every good southerner knows, butter makes it better. And WOW it really does in this case.
I found this recipe for chocolate buttercream cake in a Barefoot Contessa book a few weeks ago when I made a cake for our family friend Suzan Boyce. As delicious as Suzan's cake was, it wasn't that pretty and ended up being a trial run for the version I made the following week for Meagan. Once I had tweaked and mastered the recipe, I went a little crazy. Four tiers of crazy to be exact.

I'll warn you- this is a time consuming recipe, but it is SO worth the effort. The cake itself is the most fluffy, moist cake I've ever tasted. The trick is the cup of sour cream in the batter. On top of the cake itself being unbelievable, the icing is like nothing you've ever experienced. I love it because it really isn't all that sweet (which is dangerous because you're likely to end up eating more of it!)- that and the rum. Ina Garten lists the rum as "optional," but I consider it ESSENTIAL! What could be more indulgent than a whipped mixture of butter, sugar, chocolate and rum? It is truly sinful.
Making a tiered cake with a buttercream icing is much different than most tiered cakes you see with beautiful, smooth fondant icing. Unless you're a pro, which I am not, the buttercream looks a little less perfectly smooth than I would like when I finish icing it. For this reason, I feel that decorations are essential. Those of you who know me know that I'm a little bit Type A, so I need something about this cake to look streamlined and "perfect."
One of my favorite cake decorating tools are dragees- edible little shiny, metallic-colored balls. They are available at any cake decorating store and some specialty grocery stores. They are the perfect way to make something look fancy and special.
On Meagan's cake, I lined the edge of each tier with silver dragees. When doing this on a buttercream icing, I recommend placing the dragees with tweezers rather than your fingers because the heat of your hands will tend to melt the buttercream.
To top the cake, fresh flowers are always a gorgeous (and EASY) option. I grabbed a few different shades of pink roses, rinsed them, cut the stems to about 2 inches, removed the leaves and thorns, and arranged them on the top tier of the cake. For candles, I ALWAYS choose long sparkler candles. There is nothing more special than being presented with a cake that looks like it is topped with fireworks!

Served with pink champagne, this tiered chocolate buttercream cake made Meagan's birthday super special- and was a HUGE crowd pleaser. When I came back into the living room after handing out everyone's cake, I literally found Meagan licking her plate. I would post a picture if I didn't think it would jeopardize our friendship! However, to make my point, I will share a picture of how much the birthday girl still loved her cake the next morning!


I hope that this cake can make a special memory for you and your friends just as it did for us!
Click HERE for the Chocolate Buttercream Cake Recipe!
Click HERE for the Chocolate Buttercream Frosting Recipe!

So, we've already discussed how I have a little bit of an over-celebration problem and the birthday cake that I made for my friend Meagan's 24th birthday last weekend is a PERFECT example. Making cakes for my friends has become a tradition with me, but I will openly admit that I went a little bit overboard on this one. But hey, everyone loves a little extravagance on their birthday!

While making and eating this chocolate buttercream cake, we all need to completely erase the word "moderation" from our vocabularies. This recipe calls for so much butter that I'm shocked it isn't one of Paula Deen's recipes. But as every good southerner knows, butter makes it better. And WOW it really does in this case.
I found this recipe for chocolate buttercream cake in a Barefoot Contessa book a few weeks ago when I made a cake for our family friend Suzan Boyce. As delicious as Suzan's cake was, it wasn't that pretty and ended up being a trial run for the version I made the following week for Meagan. Once I had tweaked and mastered the recipe, I went a little crazy. Four tiers of crazy to be exact.

I'll warn you- this is a time consuming recipe, but it is SO worth the effort. The cake itself is the most fluffy, moist cake I've ever tasted. The trick is the cup of sour cream in the batter. On top of the cake itself being unbelievable, the icing is like nothing you've ever experienced. I love it because it really isn't all that sweet (which is dangerous because you're likely to end up eating more of it!)- that and the rum. Ina Garten lists the rum as "optional," but I consider it ESSENTIAL! What could be more indulgent than a whipped mixture of butter, sugar, chocolate and rum? It is truly sinful.
Making a tiered cake with a buttercream icing is much different than most tiered cakes you see with beautiful, smooth fondant icing. Unless you're a pro, which I am not, the buttercream looks a little less perfectly smooth than I would like when I finish icing it. For this reason, I feel that decorations are essential. Those of you who know me know that I'm a little bit Type A, so I need something about this cake to look streamlined and "perfect."
One of my favorite cake decorating tools are dragees- edible little shiny, metallic-colored balls. They are available at any cake decorating store and some specialty grocery stores. They are the perfect way to make something look fancy and special.
On Meagan's cake, I lined the edge of each tier with silver dragees. When doing this on a buttercream icing, I recommend placing the dragees with tweezers rather than your fingers because the heat of your hands will tend to melt the buttercream.
To top the cake, fresh flowers are always a gorgeous (and EASY) option. I grabbed a few different shades of pink roses, rinsed them, cut the stems to about 2 inches, removed the leaves and thorns, and arranged them on the top tier of the cake. For candles, I ALWAYS choose long sparkler candles. There is nothing more special than being presented with a cake that looks like it is topped with fireworks!

Served with pink champagne, this tiered chocolate buttercream cake made Meagan's birthday super special- and was a HUGE crowd pleaser. When I came back into the living room after handing out everyone's cake, I literally found Meagan licking her plate. I would post a picture if I didn't think it would jeopardize our friendship! However, to make my point, I will share a picture of how much the birthday girl still loved her cake the next morning!


I hope that this cake can make a special memory for you and your friends just as it did for us!
Click HERE for the Chocolate Buttercream Cake Recipe!
Click HERE for the Chocolate Buttercream Frosting Recipe!
Thursday, November 11, 2010
My Twist on Julia Child's TARTE AUX POMMES
"It is so beautifully arranged on the plate- you know someone's fingers have been all over it."
- Julia Child

First I must apologize for not writing this post sooner- leaving you hanging with an empty pie crust after my Pate Brisee Sucree post a while back. If you recall, I used that gorgeous pie shell in making Julia Child's TARTE AUX POMMES- an apple tarte that can be served hot or cold (I prefer hot). In "Mastering the Art of French Cooking," Julia describes Tarte aux Pommes as a classic French apple tarte that "consists of a thick, well-flavored applesauce spread in a partially cooked pastry shell. Over it thinly sliced apples are placed in an overlapping design of circles. After baking, it is coated with apricot glaze."
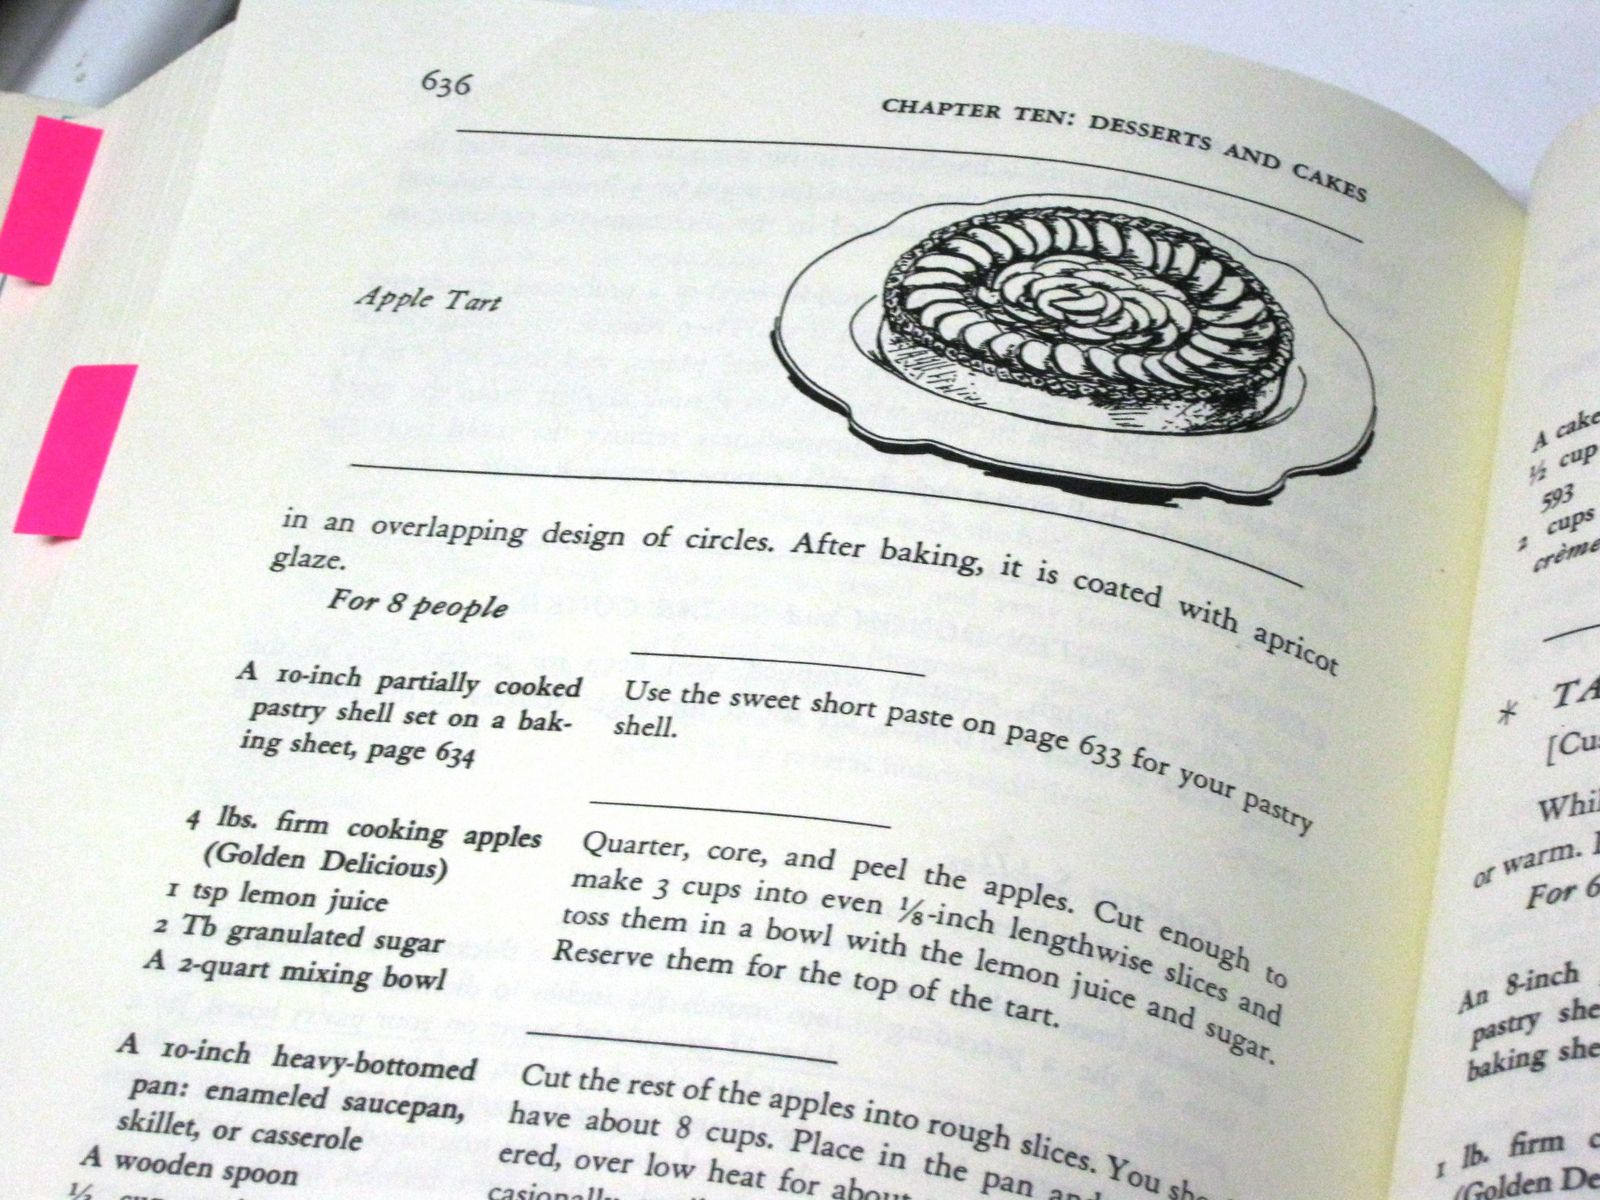
I put a little twist on Julia's recipe by replacing the Golden Delicious apples with the "pear apples" (or Chinese White Pears) that I picked up from the produce stands on I-82. The tarte turned out beautifully with the "pear apples" and was unbelievably delicious. It also held longer than regular apples probably would have. However, I would not recommend using them instead of the Golden Delicious apples if I were to make this recipe again, simply because the pear apples are much more tough and grainy, which made them a nightmare to work with.

Once your Pate Brisee Sucree is completed, the next step is to start on your apples. Quarter, core and peel 4 lbs. of apples. Once prepared, cut the apples lengthwise into even 1/8 inch crescent-shaped slices. Immediately after slicing, toss the slices in a mixing bowl with 1 teaspoon of lemon juice and 2 tablespoons of sugar. This is to prevent browning.
Here's a tip: Do one apple at a time. I made the mistake of cleaning (quartering, coring, and peeling) all of my apples at once for the sake of a good blog photo and had to go to extra measures to prevent browning.

For the first few apples (enough to make 4 cups worth of slices) make sure your slices are even and beautiful. Take your time on this because these will be the slices that will top your tarte. Toss these in lemon juice and sugar, cover with plastic wrap and place them in the refrigerator.


Next, grab a large mixing bowl and repeat this process with the remaining apples. Don't be a Type A perfectionist (like me) here, slicing each apple with meticulous care. You're wasting your time- they will be mush in the end. In this step, I found that 1 teaspoon of lemon juice and 2 tablespoons of sugar weren't enough, so add as you need it. Keep in mind that the slices only need to be lightly coated, not drenched- If drenched, the acid from the lemon juice will make them disintegrate. You should end up with about 8 cups.
Note: I find that in a process like this, having a "trash bowl" (just another large mixing bowl to throw your scraps in) makes life much easier. It keeps you from walking back and forth to the trash can constantly.

Next, place your 8 cups of slices into a large heavy-bottomed saucepan, leaving your pretty slices in the fridge- We'll get to them later. Over low heat, cook covered until tender, about 20 minutes, stirring every now and then.

Once the apples are tender, beat in 2/3 cup of sugar, 3 tablespoons of butter, 1/3 cup syrup from a jar of peach preserves, 1 tablespoon of vanilla extract, 1/2 teaspoon cinnamon, and the grated rind of 1 lemon and 1 orange.

Note: this is MY spin on this recipe. Where I used 1/3 cup syrup from a jar of peach preserves, Julia says to use 1/3 cup apricot preserves forced through a sieve. I didn't have apricot preserves or a sieve, so I worked with what I had and it turned out just fine. She also notes that you can replace the tablespoon of vanilla extract with 1/4 cup Calvados (apple brandy), rum, or cognac- again, I worked with what I had. Julia lists the cinnamon, lemon rind and orange rind all as optional ingredients, but I used them all and I recommend that you do the same- It's a flavor like nothing you've ever experienced.
Once you've beaten these ingredients together with your cooked apple slices, raise the heat and boil, stirring consistently until your applesauce is thick enough to hold a mass in the spoon. This takes a while, but be patient! It is sooooooooooooooooooooo worth it!


Preheat your oven to 375 degrees.
Grab your cooled Pate Brisee Sucree. Pour your applesauce into the pie shell and smooth over with your spoon or spatula.


Now, here comes the decorative part. Remove your pretty slices from the refrigerator. Starting on the outer edges, cover our applesauce with "a neat, closely overlapping layer of sliced apples arranged in a spiral, concentric circles."

After arranging your slices, bake your tarte in the upper third of your oven for about 30 minutes or until the top layer of apples is slightly browned and tender. Remove tarte from oven and set aside to cool.
If you left the spring-releasing edges of your false-bottomed pan on for this final baking process, carefully set your tarte atop a jar (ALWAYS HOLDING ONTO IT!) and VERY CAREFULLY release the spring sides of the pan, letting them fall to the counter, leaving your tarte on the false bottom atop the jar. Carefully slide your tarte off of the false bottom and onto a cooling rack or serving dish.
At this point, you're supposed to brush your tarte with apricot glaze (recipe available on page 593 of "Mastering the Art of French Cooking"), but I simply brought the remainder of my syrup from my peach preserves to a boil and brushed my tarte with that.


Serve warm or cold with FRESH, HOMEMADE whipped cream or creme fraiche. You have worked SO hard on this gorgeous tarte. Topping it with whipped cream from a can would simply be a crime.
This is one of the most time consuming recipes I've ever tried, but I am more proud of my TARTE AUX POMMES than I am of anything else I've ever cooked. As Julia says, "...nothing is too much trouble if it turns out the way it should."

The Perfect Beginning to the Holiday Season

I live for Christmas. I love everything about it. I make an ordeal out of every aspect of it- which drives my Mama crazy. Decorating the tree, arranging the manger scene, draping the garland, cooking our traditional Christmas morning breakfast, wrapping the presents- all of it is a sentimental process to me. All of it must be done perfectly and all done while blaring my favorite mix CD, which I appropriately titled "CHRISTMAS! YAY!"
So just as all of these things must be done each year, the season, in my little Christmas world, must begin the same way each year- with Wassail. Wassail is a warm drink that captures Christmas in every way. It smells like Christmas, tastes like Christmas, and is a constant reminder that Christmas is fast approaching.

Click HERE for my Wassail Recipe!

Wednesday, November 10, 2010
My Favorite Holiday Treat

I have to start my telling you a little bit about this special woman. Grandmother Wiginton, who we just call "Grandmother," is my dad's mom. Grandmother and Grandaddy live in a teency tiny town called Golden, Mississippi. Population 200. Yes, you read that correctly. TWO HUNDRED. Talk about a small town. Grandmother has always been one of those women who seems to know how to do just about everything, and it is from her that I have learned so many things that I cherish today. She taught me how to quilt, how to crochet, how to dig potatoes, how to gather eggs from the chicken coop, and had a huge influence on me in the kitchen.
Some of my fondest memories are from summers spent in Golden at Grandmother and Grandaddy's house. One summer I had a pet pony, Buttercup, who was rejected by her mama (my other horse, creatively named "Black Beauty") and who we brought home to the pasture behind their house. Being my only real friend there, I would dress Buttercup up in hats and scarves and feed her from a bottle. Another summer, I had a pet chicken, who I later accidentally killed by dropping it on the ground after it pooped in my hand. Whoops.
Every day my job was to gather the eggs from the chickens before I began my afternoon of cutting "paper dolls" from the gigantic Sears catalog.
Although my trips to Grandmother and Grandaddy's house have become fewer and far between through the years, we still visit every Thanksgiving and Christmas Eve. Daddy and I are somehow always the last ones to get there, but I always go straight for the kitchen, where I know I will find Grandmother over the stove and a jar of peanut brittle on the counter. This is hands-down the most wonderful peanut brittle you will ever have.
The reason that this is my favorite holiday treat is simply because of how deliciously irresistible it is. It is actually very addictive. I often eat so much of it before Thanksgiving or Christmas lunch that I'm not hungry by the time we say the blessing.
This recipe is so special to me that I almost feel like a traitor giving it out, but it is so wonderful that I just can't keep it to myself. There are lots of family recipes that I love, but have always been intimidated to try myself. This is one of them, and for that reason, I'm going to give you a step-by-step explanation of the recipe in detail. Don't be discouraged if you have to throw away a few batches before you get it right- I definitely did. My first was too sticky, my second burnt completely, but the third batch was just right. This is a tricky recipe, but well worth the effort. So, let's get started!
Ingredients:
1 cup sugar
1/2 cup light Karo syrup
1 cup water
1 cup RAW redskin peanuts
1/4 stick butter
1 teaspoon vanilla extract
1/2 teaspoon baking soda
Directions:
Tips: Do not try to multiply this recipe. It is tricky on its own and must be done so quickly that it won't work in large quantities. There simply isn't enough time. Also, NEVER leave the stove and NEVER stop stirring.
1. In a saucepan, combine sugar, Karo syrup, and water. Combine and stir.
Tip: Grandmother says to cook at 1 notch above medium, but I got impatient and cooked at 2 notches above medium and it worked just fine. All stoves are different, so just cook accordingly.
2. Cook until it spins a thread. I didn't know what that meant, so I figure that some of you don't either. When you lift your spoon from the mixture, an ultra-thin wispy string should form and fly back from your spoon. The string should be long.
3. Add raw peanuts- Mixture will be white and bubbly at this point. Mixture will thicken greatly after adding the peanuts so you MUST STIR CONSTANTLY.
4. Cook until it's a light honey color- Not too long or the baking soda won't react properly.
5. Set saucepan off the eye.
6. Add butter and vanilla extract and stir, then add baking soda. Combine completely.
Tip: This must be done VERY quickly, so it's best to have your peanuts, butter, vanilla extract and baking soda measured out beforehand. Also, BAKING SODA MUST BE ADDED LAST!
7. Pour mixture onto greased cookie sheet and immediately spread it a little with your spoon, spatula or whatever you're using. Don't do this too much or it will string and be ugly.
8. Pull the brittle.
This is the step that I was the most nervous about. When Grandmother was explaining this recipe to me over the phone, I told her how nervous I was about this step and she told me that I didn't really have to pull the brittle, but Grandaddy immediately yelled from the other room that it's not worth eating unless it's pulled- and boy was he right! The thing that makes Grandmother Wiginton's Peanut Brittle so wonderful is that it is almost paper thin.
With a knife, gently lift edges and pull brittle thinner, but without tearing. Be careful- it's hot!
Pull every minute or so until hard- it's better when paper thin.
Tip: DO NOT taste test until brittle is completely hard- You will break a tooth!


If, in the end, your brittle is too sticky and is impossible to get out of your teeth, you've messed up in one of three places. Either, you didn't let the mixture spin a long enough thread, you didn't let the mixture cook long enough after adding the peanuts, or you didn't put in enough baking soda. Without being there, I can't tell you which one of these it is, but through trial and error, you'll figure it out.
Also, if you're making this as a gift and plan on making multiple batches, keep in mind that 1 bottle of Light Karo Syrup will give you four batches.

Tuesday, November 2, 2010
Halloween Nostalgia

When I look back into my file of such memories, I always find Halloween and the annual Halloween dinner parties that my family threw. We were living at our old house on Franklin Street, where I spent the majority of my childhood. Every Halloween, Mama and Daddy would invite all their friends over for chili and martinis. The children would have dinner first- always Mama's chili and Suggie's broccoli cornbread (just about the most delicious thing on earth!). After dinner, we were off to trick-or-treat with whoever our parents had managed to con into taking us that year. One year it was even Mr. Estes, a teacher from our school. I still feel sorry for him about that one. Once we returned home, our bags filled with candy and our parents filled with martinis, everyone was happy.

I remember being so excited to go into that room that night. It was special to get to have dinner in there. Don't get me wrong. Our house wasn't one of those where children aren't allowed in certain rooms for the parents' fear of antiques being destroyed. It just wasn't where we normally sat down for dinner each night. Sitting in that big chair, under that magnificent spider web with all of my friends, eating my chili from Mama's good china instead of my normal soup bowls, with the big chandelier glowing as though it were hung just for us beneath the web- that is my special memory.
I felt special. And proud. With just a few bags of cheap plastic spider web, she had created a whole other world just for us, and as corny as it sounds, it was really pretty magical. Although my life is very different now than it was back then, I still make chili and broccoli cornbread (and maybe a few dirty martinis) every Halloween and remember that special night beneath the spider web.
Even though we're all grown up now, maybe it's good for us to look back every now and then, recognize the tough times, accept them for what they are, and cherish the wonderful times with as much joy as we did as children.

My decorations for the dining room table at this year's Halloween dinner party
I would love to hear some of your favorite memories, so leave a comment! Click HERE for Mama's Chili recipe
Click HERE for Suggie's Broccoli Cornbread recipe
Enjoy!

Napoleon's Frog Prince Halloween costume

Sweet Sarah Grace Rowe in her 2nd costume of the night

Sarah Stubblefield, Caroline Wills and me as the Powerpuff Girls on Senior Dress Up Day at Randolph

Sarah Stubblefield, Maggie Oliver and me as contestants from Legends of the Hidden Temple
(the Purple Parrots were always may favorite!)
Subscribe to:
Posts (Atom)