Thursday, October 14, 2010

Pâte Brisée Sucrée [Sweet Short Paste]

“Pastry is like people,” says Anne, who translates the rest. Some dough needs a lot of kneading, some requires much less. Some dough is satisfied just a little, while other dough needs to double in size. All dough needs warmth to rise. 
- The Sharper Your Knife, The Less You Cry by Kathleen Flinn

When trying to figure out what to do with these “pear apples” I brought home from the I-82 produce stands, I went straight to recipes that involved apples since they were apparently similar. All of the apple pie recipes I found looked so normal and I really wanted to do something a little more challenging. Finding and trying challenging recipes has been a big part of my life since I decided that I want to go to culinary school. This is mainly because I don’t want to get there and look like a total idiot who thinks she can cook just because she can make a few things beautifully. Yes, people rave about my guacamole, my brioche, and many other things, but in all honesty a six year old could probably pull off both of those things. In search of something fancier, I immediately turned to Julia. Julia Child that is.
My copy of Mastering the Art of French Cooking is quickly becoming well broken in. The pages are covered in splatters of sauces and smears of flour. I look at it like a normal person looks at an encyclopedia, because it really is so comprehensive. 
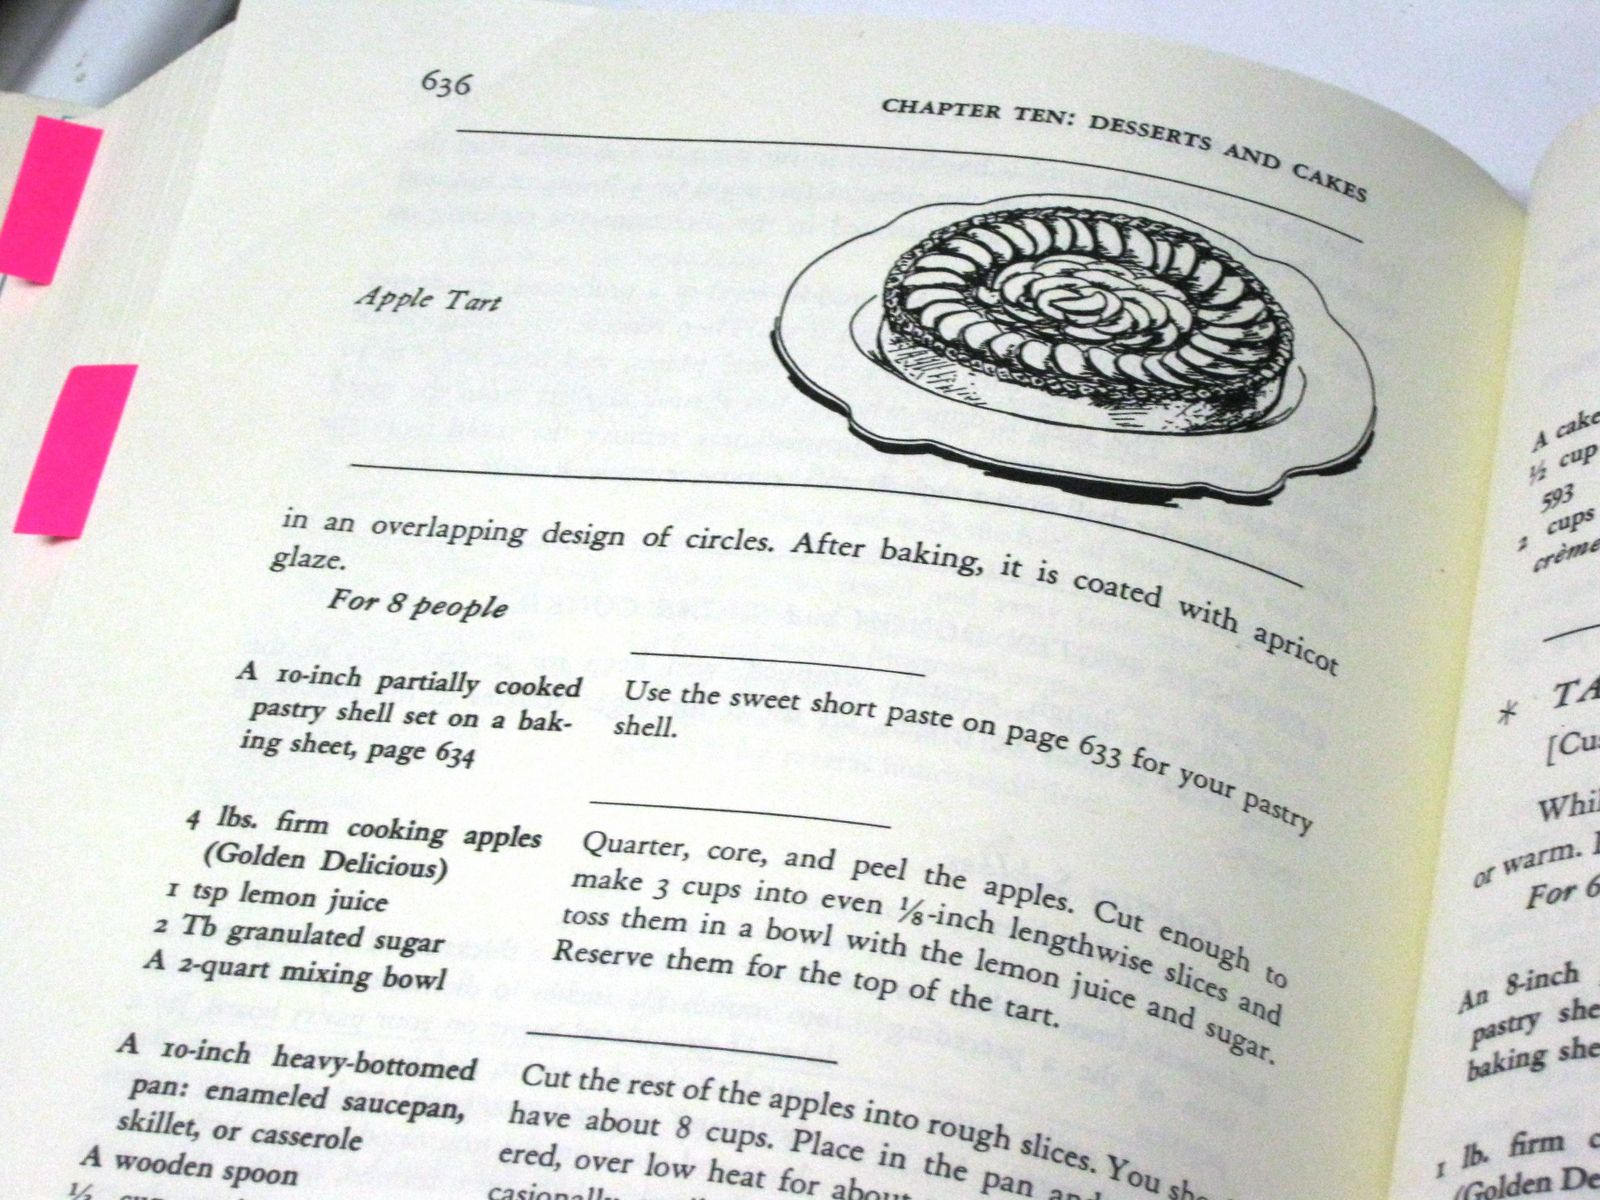
I went to the section on Dessert Tarts and found Tarte aux Pommes (which is the pretty French way of saying apple tart). Reading through the recipe, which Julia writes beautifully as more of an article than a recipe, I realized that it was going to be a bit of a process, calling for Pâte Brisée Sucrée, the pretty French way of saying pie crust.
If you’re going to take the time to do this, I recommend doing it in abundance. Just for the heck of it, I tripled the recipe. This pastry dough can last in the refrigerator for up to 3 days, but can be frozen for many weeks. While making this pastry shell, I thought “I have never appreciated store-bought pastry shells more than right now,” but once I finished, the thought of buying a store-bought pastry shell seemed completely ridiculous. I never thought a crust could be SO DELICIOUS. This sweet short paste is made exactly like a regular short paste (like you would use for a quiche), but you mix the sugar into the flour before you begin rather than after. 

Now, you can make this dough either by hand mixing or with a food processor. I don’t own a food processor of my own, so hand mixing was my only option. Besides as Julia says, “A pastry blender may be used if you wish, but a necessary part of learning how to cook is to get the feel of the dough in your fingers. Il faunt mettre la main à la pâte!” 
Go ahead and blend your dry ingredients in a large mixing bowl, then add your “fats” (butter and vegetable shortening).
Julia emphasizes the importance of working QUICKLY, which always scares me. I guess I should get used to it though since I will soon be required to do everything quickly in the kitchen. If you have a warm kitchen, CRANK UP THE A.C.! Also, I tend to enjoy a glass of wine while I’m in the kitchen, but if you get flushed and heated from this, wait until after your pastry is done to have a cocktail. The heat from your hands can ruin the entire process. Here are Julia’s instructions:
“Rub the flour and fat together rapidly between the tips of your fingers until the fat is broken into pieces the size of oatmeal flakes. Do not overdo this step as the fat will be blended more thoroughly later.” 
Don’t worry if your bits aren’t quite as small as oatmeal flakes, because it will be taken care of later. Especially if you have wine-warmed hands like mine and an over-head light that could substitute a space-heater.

Next, Julia instructs us to, “Add the water and blend quickly with one hand, fingers held together and slightly cupped, as you rapidly gather the dough into a mass. Sprinkle up to 1 tablespoon more water by droplets over any unmassed remains and add them to the main body of the dough. Then press the dough firmly into a roughly shaped ball. It should just hold together and be pliable, but not sticky.”
Our next step is the “fraisage,” or final blending. Note: You must do this step even if you made your dough with a food processor. 
I was nervous about this step because I am notoriously horrible at kneading. One Christmas, while making homemade pasta with the Gesslers, I was called out on my inabilities and referred to as a child with play-doh. But I had to face my fears and go for it. 

Transfer your mass of dough onto a lightly floured cutting board and lightly sprinkle your dough with flour. I’m going to go ahead and give you Julia’s instructions word-for-word due to my fear of re-wording it and messing you all up. 
“With the heel of one hand, not the palm which is too warm, rapidly press the pastry by two-spoonful bits down on the board and away from you in a firm, quick smear of about 6 inches.”
“With a scraper or spatula, gather the dough into a mass; knead it briefly into a fairly smooth round ball. Sprinkle it with four and wrap it in waxed paper.”
Once you’ve wrapped up your dough, place it in the freezer for about 1 hour until it’s firm, or (if you have the time) refrigerate it overnight. 
Such a typical college freezer. Bourbon, TCBY, frozen dinners and hot pockets. I guess I  mixed it up a bit with the pastry dough. 
Once the dough has become workable, it’s time to roll it out. Again, I was nervous about this step because of my lack of counter space. 
My only option was to place my cutting board on top of my pre-heating oven, which of course warmed up my dough- making my life VERY difficult. If this happens to you for some reason, don’t feel bashful about sticking it back into the freezer for a few minutes to make it workable again. This is a much better option than trying to work with hot dough. This dough in particular becomes difficult to handle because of its high butter content- which is also the thing that makes it so delicious so we can’t complain too much. 

Place your dough on the floured cutting board and sprinkle the top with flour. If you’re like me and are deathly afraid of sticky dough, cover both your hands and your rolling pin in flour as well. 


Now, I’m usually not big on product promotion, but since I’m not being particular about brands here, I’ll give you this wonderful tip. I was wandering around Target’s baking section and came across this wonderful baking mat. It has circles drawn on it that tell you how large to roll out your dough for each different size of pan. How wonderful is that! You will never roll your dough too small again- because we all know how frustrating it is to roll out your dough and then be unable to cover your pan. 

Roll your dough to the appropriate size, sprinkling with flour whenever necessary, until you have a circle that is about 1/8 inch thick and about 2 inches larger all around than your pan. If it’s uneven- as mine ALWAYS is- just even it out with your knife. Here’s Julia’s tip on this topic:


“If your circle is uneven, cut off a too-large portion, moisten the edge of the too-small portion with water, press the two pieces of pastry together, and smooth them with your rolling pin.”

NOTE: You must use your dough IMMEDIATELY or it will soften and be a total wreck. 


To avoid the typical American “country” looking pie, I used a false-bottomed cake pan with spring-releasing edges. I have always been afraid of these pans, but now I AM OBSESSED! IF YOU DON’T HAVE ONE, GET ONE...OR FOUR!


Alright, now here’s the semi-tricky part. Getting the dough into the pan. First, butter your pan EXTREMELY WELL!


My Mama, and many others, were taught to transfer the dough by rolling it over the rolling pin and over the pan. I fail at this process every time, but luckily, Julia provides us with another option that I LOVE! Okay here we go. Sprinkle your dough with flour so that there is no chance of it sticking to anything AT ALL. Fold it in half, and then again, so that one edge is a perfect 90 degree angle. Place this 90 degree angle in the center of your pan and simply unfold. It is amazing how perfectly this works. 


Press the dough lightly on the bottom of the pan, then lift the edges and work it down the inside edges of the pan with your fingers, “taking in about 3/8 inch of dough all around the circumference. This will make the sides of the pastry shell a little thicker and sturdier.”


Once it’s in, trim off the edges and press in a pretty pattern around the edge with your knife. 


Then prick the bottom with your form to avoid puffing and rising. Now come the protective measures. This was completely new to me and seemed crazy. Apparently it’s been done forever and is totally normal. I was telling Mama about it over breakfast like I had discovered something phenomenal and she looked at me like I was an idiot. 


To avoid your pastry shell from collapsing or rising, line the inside of the shell with buttered aluminum foil and fill it with beans to weigh it down! How neat is that! 


My recipe for Tarte aux Pommes called for a partially cooked shell, which is partially baked, then filled, then baked again. Here are Julia’s instructions:

“Bake at the middle level of a preheated 400-degree oven for 8 to 9 minutes until pastry is set. Remove mold or foil and beans. Prick bottom of pastry with a fork to keep it from rising. Return to oven for 2 to 3 minutes more. When the shell is starting to color and just beginning to shrink from sides of mold, remove it from the oven. If it seems to you that the sides of the shell are fragile, or are liable to crack or leak with the weight of the filling to come, do not unmold until your tart or quiche is filled and finally baked.”
This was my final product, which seemed to me “liable to crack” so i left the sides of the pan on until my tart was filled and baked. This is quite a process, but is SO UNBELIEVABLY WORTH IT! 


Enjoy!


“Noncooks think it’s silly to invest two hours’ work into two minutes’ enjoyment, but if cooking is evanescent, so is the ballet.” -Julia Child



Wednesday, October 6, 2010

The Produce Stands of I-82

A couple of weeks ago, I took my little pug, Napoleon, on his first trip to the family beach condo in Destin, FL. It rained practically the entire weekend and I quickly learned that a condo on the 20th floor is no place for a semi-housebroken puppy, but one great thing did come from the weekend- a wonderful blog topic!
The drive from Tuscaloosa to Destin is about 4.5 hours, the first two of which take you along the winding two-lane I-82. I absolutely LOVE this part of the drive. Besides the scenic landscape and quaint little towns between Tuscaloosa and Prattville, I-82 is FILLED with wonderful family-run produce stands that are stocked with the freshest and most gorgeous produce you can find. I didn't get to make any stops on my drive to or from the beach (not having cash and the stands being closed on Sundays), but it was all I could think about when I got home. A few days later, my afternoon class was cancelled so I decided to make the trip.
My biggest fear, which, of course, I was stuck behind for most of the drive.

Now, I understand that most of you aren't willing to spend four hours in the car just to go get some fresh fruit and veggies, but if you're passing through, STOP! AND STOP AT ALL OF THEM! Not only is this produce amazing, but it is so much cheaper than what you find in the grocery store! (This is probably because you aren't paying to have it shipped half-way across the country.) Unfortunately, I had waited a few weeks too late and many of the stands had already closed until Spring, but don't think that stopped me from bringing home a trunk-full of goodies!
Whether I'm talking to a chef at an esteemed restaurant or a 60-year-old farmer at a produce stand on the side of the interstate, my first question is always, "Is there something that I absolutely have to have?" This isn't because I'm indecisive, but because they know better than I do. The thought of missing something special and different is unacceptable in my books, so I always make sure to cover my bases.
My first stop on this adventure was Buddy Jones Fruit Stand.
Talk about the nicest people on Earth! The man working that afternoon was so helpful and, thankfully, open to my chatty nature. I must have asked him a hundred questions. When I asked him what I absolutely had to have, to my surprise he said, "Well a pumpkin, of course!" And man did they have some pumpkins! You know how when you go to the local farmers market to get one of those giant pumpkins to carve and put on your front porch, they are usually misshaped, bruised, or completely rotten on one side? NOT the case at Buddy Jones's. I've never seen such gigantic and utterly perfect pumpkins in my life. Because of the limited space on the front steps of my apartment, I came home with two unique little pumpkins, but they had some that were up to 75 pounds!
I also fell in love with Buddy's small decorative pumpkins and gourds and came home with a bag full- more than a centerpeice could ever dream of holding. I admit, I got a little swept up in the moment while making this particular purchase, not bothering to realize that I don't have a table in my apartment remotely big enough to hold any sort of centerpiece at all. Whoops!
While I was there, I also picked up some gorgeous tomatoes and a basket of Starfire peaches. Before this stop, I had no idea what a Starfire peach was, but the nice man at Buddy's was happy to explain. Starfire peaches are sweeter and jucier than most, with a non-browning flesh, which is super convenient if you are a slow peeler like me! They're great for cooking, baking, canning and freezing.
At this point, I thought it was time to move on to the next stand, until I saw my ultimate weakness- homemade canned goods. Seeing those Mason jars with the hand written labels took me right back to the shelves of canned green beans and peach preserves in my Grandmother's storm shelter in Golden, Mississippi. I simply couldn't resist. I went straight for a jar of fig preserves, Mama's favorite, which are TO DIE FOR! Then I saw something unfamiliar. Scuppernong Jelly. I didn't have a clue what a scuppernong was, so I turned to my helpful new friend, who taught me that it is a lot like a grape. It grows on a vine and is similar to a white grape, but has a bronze color and is a little bigger. Whatever it is, it makes delicious jelly!
My second and, unfortunately, my final stop was Lawley's Chilton County Peaches.
This stand was run by an older couple, who weren't quite as comfortable with my chattiness. Honestly, when I asked them what I absolutely had to have, they looked at me like I was an idiot. The little woman replied with, "Well, how would I know. You're the one who needs it." Not quite the answer I was looking for, but then again, I guess she had a point. I tried to easy my way through after that, picking up some more peaches and some more tomatoes. The thing I loved about Lawley's was the personal aspect. When I asked the old man about the peaches, he told me that he had personally picked them from his home down the road that very morning, that they were still a little hard, but that they would ripen up in a couple of days. Apparently, I was lucky to be getting peaches at all. He was telling me that peaches are usually done by this time, but because of the cold winter last year, they were a few weeks late.
My last purchase at Lawley's was something I had never seen before. I looked at the basket of fruit for a good while before I got the guts to ask the woman what I was looking at. They looked like apples, but were much bigger, had a rough skin, and were a strange shade of green- not like a Granny Smith apple, but green like a pear. I was right on the pear part. They were what she called "pear apples". I asked her if I could use them in a pie and she told me that she had a woman come by last week to tell her that they made a better pie than any apple she had ever seen. I didn't have a clue, so I went ahead and bought a basket of them.
I did a little research on them and found that they are actually Chinese White Pears. They have a rough skin, which is EXTREMELY difficult to peel, a high water content and an ultra-grainy texture. From what I found on the Internet, they usually aren't used in pies of jellies because of their high water content. Despite my research, I followed the lady's advice and baked the most beautiful apple tart I've ever made.
Upon returning home, I realized that I bought WAY too much and had some serious baking to do.
Napoleon was worn out from shopping all day!

 Be looking for my next few blog posts to see which recipes I chose to use up all of my I-82 goodies!


Monday, September 27, 2010

Food for Fall and Football


Are y’all as excited as I am that it is FINALLY getting chilly outside?! My roommate Kathryn has been teasing me because all I can talk about is how excited I am to wear a turtleneck again! I LOVE Fall almost as much as I love Winter- mainly because it means it’s almost time for coats and Christmas, but it has its own personal perks as well- one of them being football. Now, many of you who actually know me may laugh when you read that because you probably know that I don’t really understand football all that well, and you would be correct, but that doesn’t mean that I don’t LOVE it.
                Going to the University of Alabama, football is clearly a big part of life. I may not understand the game, but I definitely understand the party that goes along with it. There is nothing like waking up early for a game, putting on your gameday dress and pouring a whiskey drink. It may not be the most ladylike cocktail in the world, but goodness it’s good. When you can’t make it to the game though, here’s one of my favorite recipes for a gameday dinner at home. This is PERFECT for a house full of boys. Two weekends ago, I had a few friends over to watch the game and this is what I made for them.
The Menu:
Nana’s Babyback Ribs
Guy’s Slaw
Creamed corn

Nana’s Baby back Ribs:
This recipe for baby back ribs comes from Mrs. Vivian Martin, better known to me as Nana. Nana was Vivian’s (my childhood bff) grandmother and it is AMAZING! I always remember having these growing up- and thank goodness it was one of the few recipes that we could squeeze out of the secret Schreeder recipe lock-box. First, I need to explain my personal feelings on barbecued anything. I like it rather dry. I am not a fan of any sort of barbecue sauce, unless it is the thin liquid spicy sauce from The Dixie Pig in Blytheville, Arkansas. Don’t even get me started on The Dixie Pig- I’ll just tell you that I look forward to Suggie (my grandmother) bringing this barbecue every Christmas more than I look forward to the presents she brings. Nana’s recipe is for a dry rib- and to ask for bbq sauce with them is almost insulting. It would be the equivalent of asking for ketchup with a filet. Just don’t do it. However, if you MUST, then at least try a bite without before you ruin it. Click HERE for the recipe!
Guy’s Slaw:
This slaw is named after my grandfather, Suggie’s husband, Guy Newcomb (better known in our family as “Big Sug”). If you’re wondering where these nicknames came from, yes, they are what Guy and Jean Newcomb were/are called by their grandchildren, but what is even sweeter, is that this is what they called one another. “Sug”- pronounced “shug,” but under no circumstances spelled that way- stands for “Sugar.” And so he was “Big Sug” and she was “Suggie.” Guy Newcomb loved  his slaw, and because of that, I am EXTREMELY particular about how it is made. If you plan on buying a bag of pre-shredded cabbage, don’t even bother reading the rest of this recipe- that’s simply not how it’s done here. The way that the cabbage is chopped is what makes Guy’s Slaw unique. It must be chopped into small squares that are about they size of a key on a keyboard. Everything else is in the instructions is pretty straight-forward, but I had to be specific about that one! Click HERE for the recipe.

Creamed Corn:

Creamed corn is an ultimate Southern comfort food. I love how we consider this a “vegetable” with our dinner, when really it is a starch, heated with melted butter, then thickened with whole milk, corn starch and salt. Still sounds pretty wonderful though, doesn’t it?
I have a few tricks for you with this one. First of all, haven’t you always thought that it was called “creamed corn” because the corn was drowned in cream? I sure have. Until my Mama taught me this trick. When you are slicing the corn off of the cob you need to do it in two thin layers. First cut the kernels in half, taking the first layer off. Then cut the rest of the kernels off the cob. When you do this, you let the “cream” out of the corn. I thought this sounded ridiculous, but it really does let the milky wonderfulness out of the kernels and makes your creamed corn 10,000 times better!
                Trick # 2 comes from Rachel Ray via Mama. When cutting the corn off the cob, place a small bowl upside down in your large bowl and balance each cob on top while you slice. This makes it SO much easier! Here’s what it looks like.
This “vegetable” is the perfect comfort item to finish of this menu. Click HERE for the recipe. Enjoy!

Friday, September 17, 2010

Last Night's Dinner at Dad's

       I am home in Huntsville for the weekend, which always means LOTS of cooking. When I come home, I take full advantage of my time and SPACE to cook for my family and friends. Minuscule is a kind way to describe the kitchen in my apartment at school, so my cooking is limited there. I am staying with my father this weekend and decided to cook dinner for us last night. I wanted to try something new, so I flipped through the August 2010 issue of Bon Appetit magazine and honestly had a hard time picking out of the multitude of delicious looking recipes, but decided on the bruschetta with rosemary, roasted plum tomatoes, ricotta, and prosciutto to start, followed by the grilled mustard chicken with fresh corn polenta. Both of these recipes can be found on the magazine’s website. I tweaked both recipes a bit due to my forgetfulness at the grocery store.
       This bruschetta is now one of my FAVORITE bruschetta recipes I’ve come across. Since they were out of plum tomatoes at the grocery, I used cherry tomatoes instead and I think I actually prefer them since they are smaller and more appropriately bite-sized for this particular dish. Instead of using their marinade for the tomatoes, I used my own that I frequently use. After placing the halved tomatoes on a sheet pan covered in foil, I sprinkled them with some good olive oil, balsamic vinegar, salt (it is essential to use a good salt- kosher at least, but a good fleur de sel makes such a difference), fresh cracked pepper, rosemary and oregano. Then I tossed it with my hands and let it sit for a few minutes to absorb the flavors. Then into the oven they went!

       This recipe says to roast them at 425 for about 35 minutes, but keep in mind that they are using larger plum tomatoes. It doesn’t take quite as long with the cherry tomatoes, so just keep an eye on them. 

       Instead of arugula, I used a yummy frisee blend and tossed it in a bit of the marinade I had prepared for the chicken (before it touched the raw meat of course) just because I already had it made and I liked how it would tie the mustard flavor into both of my dishes. 

       The final product was UNBELIEVABLY DELICIOUS! I do have one tip though: I did not follow the recipe’s instruction to fold the prosciutto slices and placing them side by side on the baguette. I didn’t really see the point until I bit into my finished product and the entire topping slid right off the baguette. I might even recommend roughly chopping your prosciutto into small pieces just to ensure that this doesn’t happen to you. 
       For the chicken, I used two bone-in chicken breasts instead of thicken thighs, simply because I like it more. I also did without pinning the skin down after placing the marinade beneath it, but in the end, I regretted it. I think the marinade would have stayed more in place on the grill, but oh well, live and learn! I also chose to combine a coarse dijon mustard with a smooth one. I didn’t really do this for any particular reason other than changing things up a bit, but I really liked how it turned out. 

       I had some of my roasted tomatoes left over from the bruschetta, so I placed them on top of my polenta, which added an extra boost to the overall dish. It ended up being a well rounded, comforting supper that I would recommend to anyone! Very easy and not too time consuming! I’d love to hear your take on it and any twists you may have made to the recipe! 

Enjoy!


Links to the Recipes: